1.Volley的作用
Volley既可以访问网络取得数据,也可以加载图片,适合进行数据量不大但通信频繁的网络操作
2.Volley发送简单请求
添加网络请求:
如需使用 Volley,您必须向应用清单添加 android.permission.INTERNET 权限。否则,应用将无法连接到网络。
<uses-permission android:name="android.permission.INTERNET"/>
现在比如说我要去获取百度的的数据
String url ="https://www.baidu.com";
TextView textView = findViewById(R.id.text);
RequestQueue requestQueue = Volley.newRequestQueue(this);
StringRequest stringRequest = new StringRequest(Request.Method.GET, url, new Response.Listener<String>() {
    @Override
    public void onResponse(String response) {
        textView.setText(response);
    }
}, new Response.ErrorListener() {
    @Override
    public void onErrorResponse(VolleyError error) {
        textView.setText("失败了");
        Log.d("tag",""+error);
    }
});
requestQueue.add(stringRequest);
该代码可以实现获得百度界面的数据
2.1一些理解
具体的实现原理就是:
我们创建一个Request(这段代码里面的StringRequest)对象时,需要将它添加到RequestQueue中,以便它可以被调度执行。RequestQueue会负责将请求发送到服务器,并将响应返回给应用程序。
您调用
add()时,Volley 会运行一个缓存处理线程和一个网络调度线程池。将请求添加到队列后,缓存线程会拾取该请求并对其进行分类:如果该请求可以通过缓存处理,系统会在缓存线程上解析缓存的响应,并在主线程上传送解析后的响应。如果该请求无法通过缓存处理,则系统会将其放置到网络队列中。第一个可用的网络线程会从队列中获取该请求,执行 HTTP 事务,在工作器线程上解析响应,将响应写入缓存,然后将解析后的响应发送回主线程以供传送。请注意,阻塞 I/O 和解析/解码等开销大的操作都是在工作器线程上完成的。您可以添加来自任意线程的请求,但响应始终会在主线程上传送。
先搞清楚:现在一共是有3个线程:
第一是主线程MainThread
第二是缓存线程CacheThread
第三是网络线程NetThread
下面是我的理解。
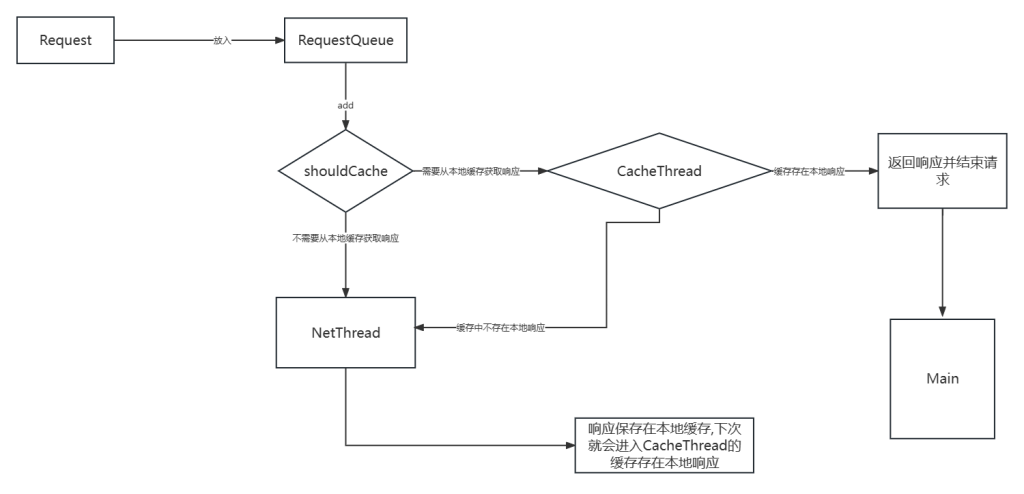
add()之后会把请求添加到队列里面,CacheThread会对内容进行分类,如果请求通过分类,,就在CacheThead进行解析,最后在MainThread进行响应;如果没有通过分类,那么会进入NetThread,可用的NetThread进行解析.再在CacheThead中响应,最后发给MainThread
但是不太对,ChatGPT给出的解释是:
RequestQueue是用来处理所有网络请求的队列,包括发送网络请求、处理响应和错误等。在Request对象被添加到RequestQueue中后,它会等待执行,直到当前网络请求被处理完毕,然后才会执行下一个请求。
CacheThread并不会对请求进行分类,而是通过Request对象的shouldCache方法来判断当前请求是否应该被缓存。如果一个请求应该被缓存,CacheThread会先在本地缓存中查找对应的响应,如果本地缓存中有响应,则直接返回缓存的响应;否则,CacheThread会将请求转发给NetThread进行处理,并将响应保存在本地缓存中。如果一个请求不应该被缓存,CacheThread会将请求直接转发给NetThread进行处理。
NetThread用于执行网络请求,并将响应返回给CacheThread。如果一个请求需要被缓存,CacheThread会在收到响应后将响应保存在本地缓存中,并返回给主线程进行处理。如果一个请求不需要被缓存,CacheThread会将响应直接返回给主线程进行处理。
最后,主线程会在收到响应后进行处理,例如将响应显示在界面上。
总的来说,RequestQueue会将网络请求添加到队列中,并通过不同的线程来处理请求和响应。CacheThread用于处理本地缓存的请求,并将请求转发给NetThread进行处理;NetThread用于执行网络请求,并将响应返回给CacheThread或主线程进行处理。主线程最终用于处理响应并将其显示在界面上。
3.源码解析Volley
首先先看
newRequestQueue()里面的源码
一个参数的构造(最常用的构造)
public static RequestQueue newRequestQueue(Context context) {
return newRequestQueue(context, (BaseHttpStack) null);
}
两个参数的构造
public static RequestQueue newRequestQueue(Context context, BaseHttpStack stack) {
BasicNetwork network;
if (stack == null) {
if (Build.VERSION.SDK_INT >= 9) {
network = new BasicNetwork(new HurlStack());
} else {
// Prior to Gingerbread, HttpUrlConnection was unreliable.
// See: http://android-developers.blogspot.com/2011/09/
androids-http-clients.html
// At some point in the future we'll move our minSdkVersion
past Froyo and can
// delete this fallback (along with all Apache HTTP code).
String userAgent = "volley/0";
try {
String packageName = context.getPackageName();
PackageInfo info =
context.getPackageManager().getPackageInfo
(packageName, /* flags= */ 0);
userAgent = packageName + "/" + info.versionCode;
} catch (NameNotFoundException e) {
}
network =
new BasicNetwork(
new HttpClientStack(AndroidHttpClient.newInstance(userAgent)));
}
} else {
network = new BasicNetwork(stack);
}
return newRequestQueue(context, network);
}
private static RequestQueue newRequestQueue(Context context, Network network) {
final Context appContext = context.getApplicationContext();
// Use a lazy supplier for the cache directory so that newRequestQueue() can be called on
// main thread without causing strict mode violation.
DiskBasedCache.FileSupplier cacheSupplier =
new DiskBasedCache.FileSupplier() {
private File cacheDir = null;
@Override
public File get() {
if (cacheDir == null) {
cacheDir = new File(appContext.getCacheDir(), DEFAULT_CACHE_DIR);
}
return cacheDir;
}
};
RequestQueue queue = new RequestQueue(new DiskBasedCache(cacheSupplier), network);//1
queue.start();
return queue;
}
执行步骤是:
newRequestQueue(Context context) ->
newRequestQueue(Context context, BaseHttpStack stack)->
newRequestQueue(Context context, Network network)
3.1第二个有参构造
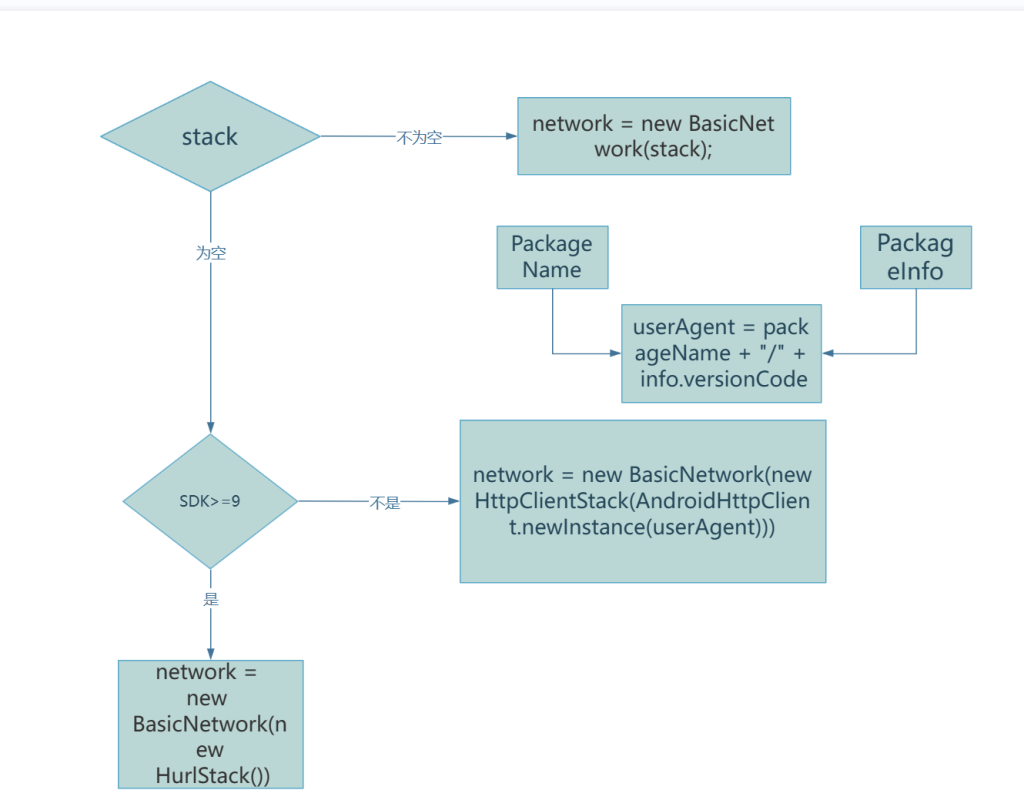
在newRequestQueue(Context context, BaseHttpStack stack)中
3.2第三个有参构造
在newRequestQueue(Context context, Network network)
private static RequestQueue newRequestQueue(Context context, Network network) {
final Context appContext = context.getApplicationContext();
// Use a lazy supplier for the cache directory so that newRequestQueue() can be called on
// main thread without causing strict mode violation.
DiskBasedCache.FileSupplier cacheSupplier =
new DiskBasedCache.FileSupplier() {
private File cacheDir = null;
@Override
public File get() {
if (cacheDir == null) {
cacheDir = new File(appContext.getCacheDir(), DEFAULT_CACHE_DIR);
}
return cacheDir;
}
};
RequestQueue queue = new RequestQueue(new DiskBasedCache(cacheSupplier), network);//1
queue.start();
return queue;
}
核心方法在于注释1处的RequestQueue queue = new RequestQueue(new DiskBasedCache(cacheSupplier), network);这真正调用了RequestQueue的构造方法。
3.3RequestQueue的真正的构造方法
public RequestQueue(
Cache cache, Network network, int threadPoolSize, ResponseDelivery delivery) {
mCache = cache;
mNetwork = network;
mDispatchers = new NetworkDispatcher[threadPoolSize];
mDelivery = delivery;
}
RequestQueue里面把Cache,Network,和threadPoolSize传进去了。
| Cache | 代表请求的缓存。它将缓存一部分响应以便下次使用,从而减少网络请求。缓存使用默认配置即可 |
|---|---|
| Network | 代表网络请求的实现 |
| threadPoolSize | 指定 RequestQueue 使用的线程池大小,即同时执行的请求数量。 |
| ResponseDelivery | 用于传递请求的响应结果(Response)和错误(VolleyError)给UI线程。它定义了两个方法:postResponse() 和 postError()。 |
3.4Network
这个Network就是具体处理网络请求的接口,这个方法中我们获得的Network都是BasicNetwork,不同之处在于其内部传入的BaseHttpStack(协议栈)不同,若SDK版本大于等于九,那么传入的是HurlStack(),SDK版本小于九的情况下传入HttpClientStack()。接着让我们看看BasicNetwork类,由于有几种构造方法已经被废弃,我们这里只看未被废弃的方法,首先看构造方法:
 public BasicNetwork(BaseHttpStack httpStack) {
    // If a pool isn't passed in, then build a small default pool that will give us a lot of
    // benefit and not use too much memory.
    this(httpStack, new ByteArrayPool(DEFAULT_POOL_SIZE));
}
其中的ByteArrayPool是一个管理字节数组池的类,它负责管理字节数组的回收和重用。在网络请求过程中,Volley 库通常需要读取和写入字节数组。为了避免频繁地创建和销毁字节数组,Volley 使用 ByteArrayPool 来管理字节数组的分配和回收,从而提高性能并减少内存占用,正如同注释所示的,它是用来提高GC性能的: /** * @param httpStack HTTP stack to be used * @param pool a buffer pool that improves GC performance in copy operations */
public BasicNetwork(BaseHttpStack httpStack, ByteArrayPool pool) {
    mBaseHttpStack = httpStack;
    // Populate mHttpStack for backwards compatibility, since it is a protected field. However,
    // we won't use it directly here, so clients which don't access it directly won't need to
    // depend on Apache HTTP.
    mHttpStack = httpStack;
    mPool = pool;
}
BaseHttpStack定义了两个具体的子类:HurlStack和HttpClientStack。其中,HurlStack使用了Android平台自带的HttpURLConnection类来执行HTTP请求,而HttpClientStack则使用了Apache的HttpClient来执行HTTP请求。
现在我们的Android设备一般都在SDK9以上,所以基本都是用的HurlStack协议栈,这里我们将只解析HurlStack协议栈的内部。
3.5BasicNetwork如何实现网络请求
就截关键的
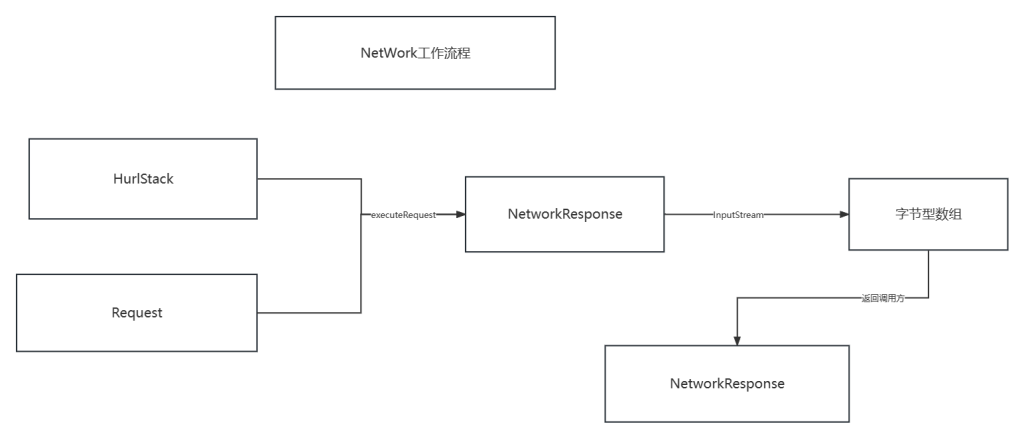
httpResponse = mBaseHttpStack.executeRequest(request, additionalRequestHeaders);
我们传入的BaseHttpStack类是Volley中HTTP协议栈的抽象基类,用于对HTTP请求进行处理。它提供了executeRequest()方法,该方法接收一个Request对象作为参数,用于执行HTTP请求并返回一个NetworkResponse对象。
获得这个Response对象后我们应该怎么做呢,在源码中告诉我们,将这个Response用InputStream获取 HTTP 响应的内容
InputStream inputStream = httpResponse.getContent();
之后怎么处理这个inputStream呢
   if (inputStream != null) {
                        responseContents =
                                NetworkUtility.inputStreamToBytes(
                                        inputStream, httpResponse.getContentLength(), mPool);
                    } else {
                        // Add 0 byte response as a way of honestly representing a
                        // no-content request.
                        responseContents = new byte[0];
                    }
这一步是将输入流转换为字节数组。具体地,通过调用 NetworkUtility 类中的 inputStreamToBytes() 方法将输入流中的内容读入一个字节数组中,同时该方法也会将输入流关闭。调用 inputStreamToBytes()用的是 ByteArrayPool (是一个管理字节数组池的类,它负责管理字节数组的回收和重用。)
最后将其封装进一个新的NetworkResponse对象中返回给调用方:
 return new NetworkResponse(
                    statusCode,
                    responseContents,
                    /* notModified= */ false,
                    SystemClock.elapsedRealtime() - requestStart,
                    responseHeaders);
3.5.1注意
第一个NetworkResponse是网络请求的响应结果,即服务器返回的结果,通常包含响应码、响应头和响应体等信息,由 HttpURLConnection 或 okhttp 等底层网络库封装而来。
第二个NetworkResponse是Volley 框架中的响应结果,也包含响应码、响应头和响应体等信息,但是经过了 Volley 内部的处理,被封装成一个 NetworkResponse 对象。
| 第一个 | 第二个 |
|---|---|
| 底层网络库的响应结果 | Volley 框架中对响应结果的封装 |
| 后者可以包含前者的全部或部分内容,但后者还包括了 Volley 内部的一些处理和封装,例如从缓存中读取响应等。因此,Volley 框架最终返回给用户的是封装后的响应结果,即 Volley 中的 NetworkResponse 对象。 |

3.6DiskBasedCache
Cache类默认实现是DiskBasedCache。DiskBasedCache使用磁盘作为缓存存储介质,将网络请求的响应数据序列化到磁盘文件中,然后在下一次请求相同URL的响应数据时,从磁盘文件中反序列化响应数据。
public DiskBasedCache(FileSupplier rootDirectorySupplier, int maxCacheSizeInBytes) {
    mRootDirectorySupplier = rootDirectorySupplier;
    mMaxCacheSizeInBytes = maxCacheSizeInBytes;
}
public DiskBasedCache(FileSupplier rootDirectorySupplier) {
    this(rootDirectorySupplier, DEFAULT_DISK_USAGE_BYTES);
}
private static final int DEFAULT_DISK_USAGE_BYTES = 5 * 1024 * 1024;
构造方法确定了缓存的最大大小为DEFAULT_DISK_USAGE_BYTES,这个常量的大小为5MB
3.7ExecutorDelivery
public ExecutorDelivery(final Handler handler) {
    // Make an Executor that just wraps the handler.
    mResponsePoster =
            new Executor() {
                @Override
                public void execute(Runnable command) {
                    handler.post(command);
                }
            };
}
这个构造确定了一个Executor,该Executor使用handle将runnable任务提交到与handle绑定的线程上执行。默认来说,这个handle将会与主线程绑定:
public RequestQueue(Cache cache, Network network, int threadPoolSize) {
this(
cache,
network,
threadPoolSize,
new ExecutorDelivery(new Handler(Looper.getMainLooper())));
}
3.8RequestQueue类
3.8.1add()
先看最直接的add方法:
public <T> Request<T> add(Request<T> request) {
// Tag the request as belonging to this queue and add it to the set of current requests.
request.setRequestQueue(this);
synchronized (mCurrentRequests) {
mCurrentRequests.add(request);
}
// Process requests in the order they are added.
request.setSequence(getSequenceNumber());
request.addMarker("add-to-queue");
sendRequestEvent(request, RequestEvent.REQUEST_QUEUED);
beginRequest(request);
return request;
}

这时候我们再看beginRequest(request)里面的源码
3.8.2beginRequest()
<T> void beginRequest(Request<T> request) {
    // If the request is uncacheable, skip the cache queue and go straight to the network.
    if (!request.shouldCache()) {
        sendRequestOverNetwork(request);
    } else {
        mCacheQueue.add(request);
    }
}
<T> void sendRequestOverNetwork(Request<T> request) {
    mNetworkQueue.add(request);
}
这个就是2.1一些理解里面画的图,如果需要从本地获取响应,则进入CacheThread否则进入NetThread
3.8.3start()
start()是从哪儿调用的呢,再3.2的第三个有参构造里面:
queue.start();
中调用的。
里面的源码:
public void start() {
stop(); // Make sure any currently running dispatchers are stopped.
// Create the cache dispatcher and start it.
mCacheDispatcher = new CacheDispatcher(mCacheQueue, mNetworkQueue, mCache, mDelivery);
mCacheDispatcher.start();
// Create network dispatchers (and corresponding threads) up to the pool size.
for (int i = 0; i < mDispatchers.length; i++) {
NetworkDispatcher networkDispatcher =
new NetworkDispatcher(mNetworkQueue, mNetwork, mCache, mDelivery);
mDispatchers[i] = networkDispatcher;
networkDispatcher.start();
}
}
上面那一段是开启了一个缓存调度线程,下面的是开启了4个网络调度线程。
3.8.3.1缓存调度线程
void processRequest(final Request<?> request) throws InterruptedException {
request.addMarker("cache-queue-take");
request.sendEvent(RequestQueue.RequestEvent.REQUEST_CACHE_LOOKUP_STARTED);
try {
// If the request has been canceled, don't bother dispatching it.
if (request.isCanceled()) {
request.finish("cache-discard-canceled");
return;
}
// Attempt to retrieve this item from cache.
Cache.Entry entry = mCache.get(request.getCacheKey());
if (entry == null) {
request.addMarker("cache-miss");
// Cache miss; send off to the network dispatcher.
if (!mWaitingRequestManager.maybeAddToWaitingRequests(request)) {
mNetworkQueue.put(request);
}
return;
}
// Use a single instant to evaluate cache expiration. Otherwise, a cache entry with
// identical soft and hard TTL times may appear to be valid when checking isExpired but
// invalid upon checking refreshNeeded(), triggering a soft TTL refresh which should be
// impossible.
long currentTimeMillis = System.currentTimeMillis();
// If it is completely expired, just send it to the network.
if (entry.isExpired(currentTimeMillis)) {
request.addMarker("cache-hit-expired");
request.setCacheEntry(entry);
if (!mWaitingRequestManager.maybeAddToWaitingRequests(request)) {
mNetworkQueue.put(request);
}
return;
}
// We have a cache hit; parse its data for delivery back to the request.
request.addMarker("cache-hit");
Response<?> response =
request.parseNetworkResponse(
new NetworkResponse(entry.data, entry.responseHeaders));
request.addMarker("cache-hit-parsed");
if (!response.isSuccess()) {
request.addMarker("cache-parsing-failed");
mCache.invalidate(request.getCacheKey(), true);
request.setCacheEntry(null);
if (!mWaitingRequestManager.maybeAddToWaitingRequests(request)) {
mNetworkQueue.put(request);
}
return;
}
if (!entry.refreshNeeded(currentTimeMillis)) {
// Completely unexpired cache hit. Just deliver the response.
mDelivery.postResponse(request, response);
} else {
// Soft-expired cache hit. We can deliver the cached response,
// but we need to also send the request to the network for
// refreshing.
request.addMarker("cache-hit-refresh-needed");
request.setCacheEntry(entry);
// Mark the response as intermediate.
response.intermediate = true;
if (!mWaitingRequestManager.maybeAddToWaitingRequests(request)) {
// Post the intermediate response back to the user and have
// the delivery then forward the request along to the network.
mDelivery.postResponse(
request,
response,
new Runnable() {
@Override
public void run() {
try {
mNetworkQueue.put(request);
} catch (InterruptedException e) {
// Restore the interrupted status
Thread.currentThread().interrupt();
}
}
});
} else {
// request has been added to list of waiting requests
// to receive the network response from the first request once it returns.
mDelivery.postResponse(request, response);
}
}
} finally {
request.sendEvent(RequestQueue.RequestEvent.REQUEST_CACHE_LOOKUP_FINISHED);
}
}
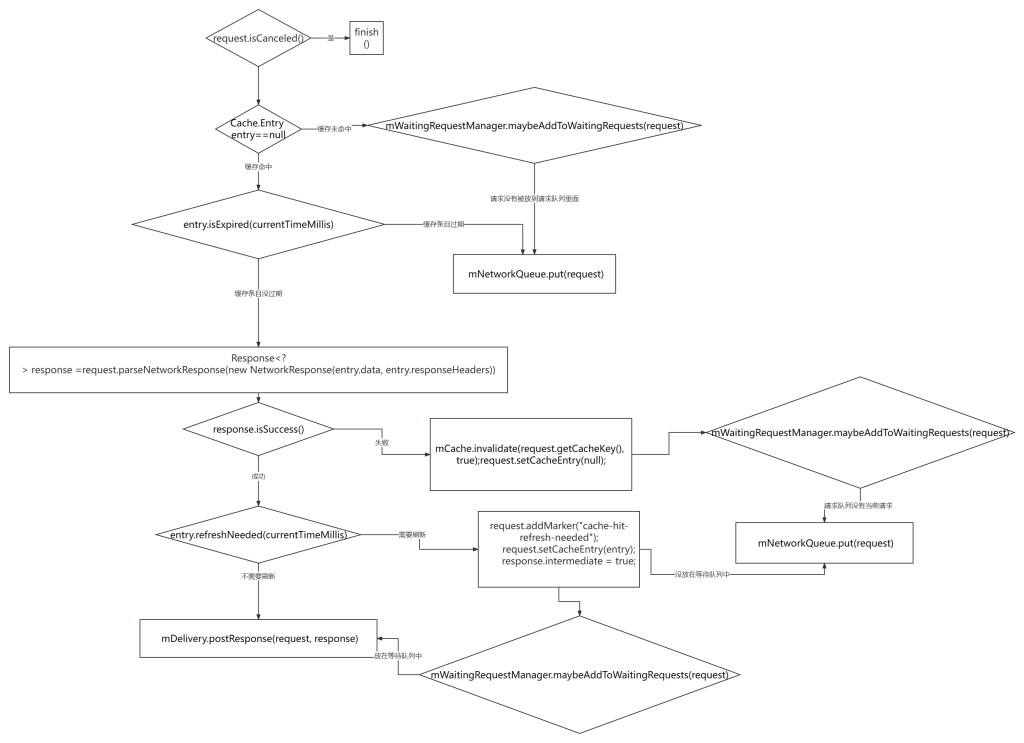
总而言之,缓存调度线程做的事就是检查缓存是否命中且命中的数据是否有效,若有效就直接返回结果;否则若缓存未命中或者命中的数据无效,就通过网络队列请求数据。
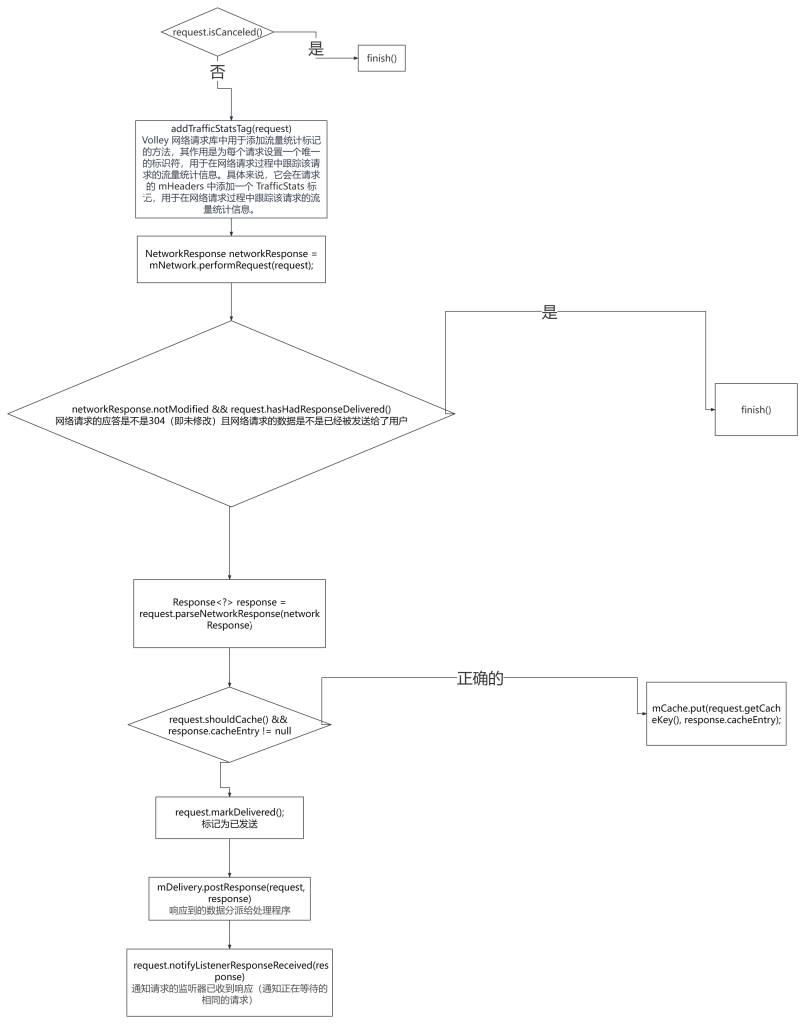
3.8.3.2网络调度线程
void processRequest(Request<?> request) {
long startTimeMs = SystemClock.elapsedRealtime();
request.sendEvent(RequestQueue.RequestEvent.REQUEST_NETWORK_DISPATCH_STARTED);
try {
request.addMarker("network-queue-take");
// If the request was cancelled already, do not perform the
// network request.
if (request.isCanceled()) {
request.finish("network-discard-cancelled");
request.notifyListenerResponseNotUsable();
return;
}
addTrafficStatsTag(request);
// Perform the network request.
NetworkResponse networkResponse = mNetwork.performRequest(request);
request.addMarker("network-http-complete");
// If the server returned 304 AND we delivered a response already,
// we're done -- don't deliver a second identical response.
if (networkResponse.notModified && request.hasHadResponseDelivered()) {
request.finish("not-modified");
request.notifyListenerResponseNotUsable();
return;
}
// Parse the response here on the worker thread.
Response<?> response = request.parseNetworkResponse(networkResponse);
request.addMarker("network-parse-complete");
// Write to cache if applicable.
// TODO: Only update cache metadata instead of entire record for 304s.
if (request.shouldCache() && response.cacheEntry != null) {
mCache.put(request.getCacheKey(), response.cacheEntry);
request.addMarker("network-cache-written");
}
// Post the response back.
request.markDelivered();
mDelivery.postResponse(request, response);
request.notifyListenerResponseReceived(response);
} catch (VolleyError volleyError) {
volleyError.setNetworkTimeMs(SystemClock.elapsedRealtime() - startTimeMs);
parseAndDeliverNetworkError(request, volleyError);
request.notifyListenerResponseNotUsable();
} catch (Exception e) {
VolleyLog.e(e, "Unhandled exception %s", e.toString());
VolleyError volleyError = new VolleyError(e);
volleyError.setNetworkTimeMs(SystemClock.elapsedRealtime() - startTimeMs);
mDelivery.postError(request, volleyError);
request.notifyListenerResponseNotUsable();
} finally {
request.sendEvent(RequestQueue.RequestEvent.REQUEST_NETWORK_DISPATCH_FINISHED);
}
}


Comments | NOTHING